Databases in Delphi Grade 11
In Grade 11 you learn how to connect a Delphi program to a Microsoft Access database, display its data on screen, and add, edit or delete records using code — without SQL (SQL comes in Grade 12).
In Grade 11 you use TADOTable and write code (loops, IF statements) to work with records.
In Grade 12 you switch to TADOQuery and use SQL statements to do the same things — faster and more powerful.
The Big Picture — How the Pieces Connect
Think of connecting to a database like setting up a water supply to a tap:
Understanding Each Component
TADOConnection — The Door to the Database
A TADOConnection is a non-visual Delphi component that establishes and manages the connection between your program and an external database file (such as a Microsoft Access .mdb file), using a connection string that specifies the file's location and the database provider (driver) to use.
Imagine the database file (.mdb) is locked inside a room. The TADOConnection is the key that unlocks the door so Delphi can get in. You tell it where the file is on your computer.
Place TADOConnection on a Data Module (a special form-like container for database components). Go to File → New → Data Module to create one.
ConnectionString  → Build... → Choose "Microsoft Jet 4.0 OLE DB Provider"
                             → Browse to your .mdb file
LoginPrompt       → False   (stops the "Enter password" popup appearing)
TADOTable — One Table from the Database
A database can have many tables (Students, Subjects, Classes…). A TADOTable represents one of those tables. You need one TADOTable for each table you want to work with.
Connection  → select your ADOConnection (dm.conDB)
TableName   → choose the table from the dropdown (e.g. "tblStudents")
Active      → True   (this "opens" the table so data loads)
TDataSource — The Go-Between
This is the part students find confusing. Why do we need it?
A TDataSource is a non-visual Delphi component that links a dataset (such as a TADOTable) to one or more data-aware controls — visual components, such as DBGrid, DBEdit or DBLabel, that are aware of and can display database data. You cannot connect a DBGrid directly to a TADOTable: every data-aware control must connect through a TDataSource.
Your TADOTable is like a water tank (holds all the data). Your DBGrid is the tap (where the data comes out on screen). The TDataSource is the pipe connecting the tank to the tap. Without the pipe, no water flows.
DataSet → select your TADOTable (dm.tblStudents)TDBGrid — The Table You See on Screen
The DBGrid is a component you drop onto your main form (not the Data Module). It displays the database records as rows and columns — just like a spreadsheet. It updates automatically as you navigate through records.
DataSource → select your TDataSource (dm.dsStudents)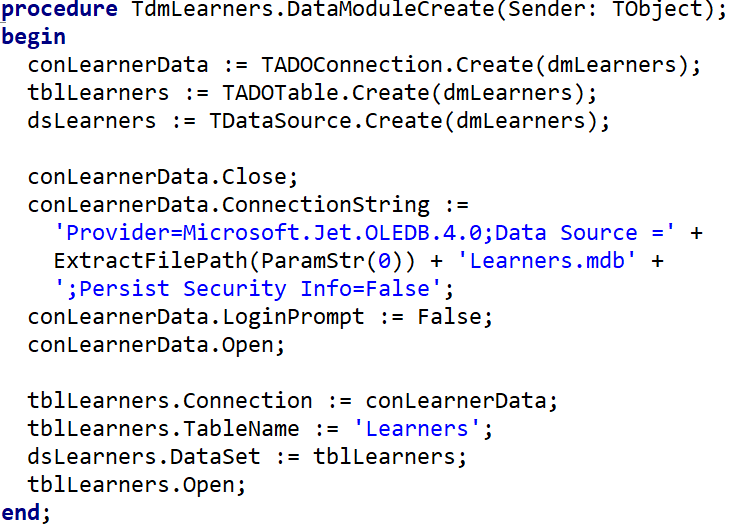
Step-by-Step Setup
- Create a Data Module: File → New → Data Module. Save it as
DataModule_u.pas. - Drop TADOConnection onto the Data Module. Set up the connection string (browse to your .mdb file). Set
LoginPrompt = False. - Drop TADOTable onto the Data Module. Set
Connectionto the ADOConnection. SetTableName. SetActive = True. - Drop TDataSource onto the Data Module. Set
DataSetto the TADOTable. - On your main form: add the Data Module name to the
usesclause at the top of your unit. - Drop TDBGrid onto your main form. Set its
DataSourceto the DataSource you created in the Data Module. - The grid should now show your database records!
Name components so you know what they are at a glance:
conStudents (TADOConnection) • tblStudents (TADOTable) • dsStudents (TDataSource) • dbgStudents (TDBGrid)
Navigating Records
Think of records as pages in a book. These methods let you turn pages:
| Method | What it does |
|---|---|
tblStudents.First | Jump to the very first record |
tblStudents.Last | Jump to the last record |
tblStudents.Next | Move forward one record |
tblStudents.Prior | Move back one record |
tblStudents.Eof | Returns True when you have gone past the last record (End Of File). Use in a WHILE loop to process all records. |
dm.tblStudents.First;                        // start at record 1
while not dm.tblStudents.Eof do           // keep going until past last
begin
  memOut.Lines.Add(dm.tblStudents['Name']); // do something with this record
  dm.tblStudents.Next;                       // move to next record
end;If you forget tblStudents.Next inside the loop, the program will be stuck on the first record forever — an infinite loop that will crash Delphi.
Accessing Field Values in Code
Once connected, you can read the value of any field in the current record using this syntax:
variable := DataModuleName.TableName['FieldName'];sName := dm.tblStudents['Name']; // reads the Name field
sSurname := dm.tblStudents['Surname']; // reads the Surname field
iGrade := dm.tblStudents['Grade']; // reads the Grade field
// Display in a label
lblInfo.Caption := dm.tblStudents['Name'] + ' ' + dm.tblStudents['Surname'];Delphi also lets you reach a field through FieldByName, e.g. dm.tblStudents.FieldByName('Name').AsString instead of dm.tblStudents['Name']. The two do the same job — this page sticks to the square-bracket version, but you'll come across FieldByName in other code and it's worth being able to recognise it.
Dataset States
A TADOTable is always sitting in one of a small set of named states, and that state controls what you're allowed to do with the current record. You've actually been relying on these states already — calling Edit or Insert doesn't touch any data by itself, it just switches the dataset into a state where changing data is legal.
| State | What it means |
|---|---|
dsInactive | The table is closed (Active is False). No reading or writing is possible until it's reopened. |
dsBrowse | The normal resting state once a table is open. You can look at records and move between them, but the current record is locked against edits. |
dsEdit | Entered by calling Edit. The active record can now be changed; Post saves it and drops the dataset back into dsBrowse. |
dsInsert | Entered by calling Insert. A blank record is waiting to be filled in; Post adds it to the table and returns to dsBrowse. |
This is why trying to change a field's value without calling Edit or Insert first raises an error — the dataset is still sitting in dsBrowse, which doesn't allow it.
Inserting a New Record
Adding a new record is a 3-step process: prepare → fill in values → save.
dm.tblStudents.Insert;                    // Step 1: prepare a blank new record
dm.tblStudents['Name']    := edtName.Text;     // Step 2: fill in the fields
dm.tblStudents['Surname'] := edtSurname.Text;
dm.tblStudents['Grade']   := sedGrade.Value;
dm.tblStudents.Post; // Step 3: save to the databasePost will raise an error if you assign a primary-key value that another record already has. It's tempting to just use tblStudents.RecordCount + 1 as the next number, but that scheme breaks the moment an earlier record has ever been deleted — you can end up reissuing a number that's already taken. The safer approach is to scan the table for whatever the highest existing value currently is, and add one to that:
function GetNewStudentNo: Integer;
var
  iLargest : Integer;
begin
  dm.tblStudents.First;
  iLargest := 0;
  while not dm.tblStudents.Eof do
  begin
    if dm.tblStudents['StudentNo'] > iLargest then
      iLargest := dm.tblStudents['StudentNo'];
    dm.tblStudents.Next;
  end;
  Result := iLargest + 1;
end;
Editing an Existing Record
// First navigate to the record you want to change, then:
dm.tblStudents.Edit;                      // Step 1: put the record into edit mode
dm.tblStudents['Grade'] := 12;            // Step 2: change the value
dm.tblStudents.Post;                      // Step 3: save the change
Deleting a Record
// Navigate to the record first, then:
dm.tblStudents.Delete; // removes the current record permanentlyThere is no undo. Always confirm with the user before deleting: if MessageDlg('Delete this record?', mtConfirmation, mbYesNo, 0) = mrYes then dm.tblStudents.Delete;
Changing a Field for All Records at Once
Some tasks need to touch every record in a table, not just one — for example handing out 5 bonus marks to every student, or applying a fee discount to a whole grade. This is really the same "loop through all records" pattern used earlier, just with an Edit / Post pair added inside it:
dm.tblStudents.First;
dm.tblStudents.DisableControls;      // stop the DBGrid refreshing on every single record
while not dm.tblStudents.Eof do
begin
  dm.tblStudents.Edit;
  dm.tblStudents['Mark'] := dm.tblStudents['Mark'] + 5;
  dm.tblStudents.Post;
  dm.tblStudents.Next;
end;
dm.tblStudents.First;
dm.tblStudents.EnableControls; // switch the grid's updates back onWithout this pair of calls, a DBGrid linked to the same dataset would redraw and scroll on every single record while the loop runs — distracting to watch, and noticeably slower once a table has more than a handful of records. DisableControls tells linked data-aware controls to stop refreshing until EnableControls is called again.
Searching for a Record
To find a specific record, loop through all records and check each one:
dm.tblStudents.First;
while not dm.tblStudents.Eof do
begin
  if dm.tblStudents['Surname'] = edtSearch.Text then
  begin
    ShowMessage('Found: ' + dm.tblStudents['Name']);
    Break;   // stop searching once found
  end;
  dm.tblStudents.Next;
end;
Filtering Records
A TADOTable can also show only the records that match a condition, without writing any SQL. Set Filter to a condition string, then set Filtered to True to apply it.
dm.tblStudents.Filter := 'Grade = 11';         // only Grade 11 records
dm.tblStudents.Filtered := True;               // switch the filter on
...
dm.tblStudents.Filtered := False;              // switch it off again — shows all records
Filter hides records that don't match — it changes which records you see. Sort changes the order of the records you see. You can use both together.
Sorting Records
dm.tblStudents.Sort := 'Surname ASC';         // A to Z by surname
dm.tblStudents.Sort := 'Mark DESC';           // highest mark first
dm.tblStudents.Sort := 'Grade ASC, Surname ASC'; // by grade, then surname
Complete Example — Finding the Highest Mark
var
  iHighest : Integer;
  sTopName : String;
begin
  iHighest := 0;
  sTopName := '';
  dm.tblStudents.First;
  while not dm.tblStudents.Eof do
  begin
    if dm.tblStudents['Mark'] > iHighest then
    begin
      iHighest := dm.tblStudents['Mark'];
      sTopName := dm.tblStudents['Name'];
    end;
    dm.tblStudents.Next;
  end;
  lblResult.Caption := sTopName + ' scored the highest: ' + IntToStr(iHighest);
end;
Linked Tables (Master-Detail)
Two related tables can be linked so that selecting a record in the master (parent) table automatically shows only the matching records in the detail (child) table — for example, click a class and see only that class's learners. The link is made on the shared key field (the foreign key in the detail table matching the primary key in the master).
tblLearners.MasterSource := dsClasses;   // point at the MASTER table's DataSource
tblLearners.MasterFields := 'ClassID';   // the linking (foreign key) field
Now the detail grid filters itself as you move through the master table — a one-to-many relationship shown live on screen. (These properties are usually set in the Object Inspector, but can be set in code as above.)
Use a master-detail link when you want two grids that stay in sync as the user browses. Use an SQL join (see Grade 12 SQL — Joining Tables) when you want the linked data combined into a single result set for a report.
Editing Records Without Code — Data-Aware Controls
Everything else on this page shows how to insert, edit and delete records using code. Delphi also provides data-aware controls that let a user browse and change records directly on the Form, with no code at all.
TDBNavigator — A Toolbar for the Dataset
A TDBNavigator (from the Data Controls tab) is a data-aware control with a row of buttons for moving through and maintaining a dataset. Set its DataSource property the same way you would for a DBGrid.
| Button | What it does |
|---|---|
| First / Prior / Next / Last | Move the pointer — the same as calling those methods in code. |
| Insert | Opens up a blank record (the dataset switches to dsInsert state) ready for the user to type into. |
| Delete | Removes the active record straight away — no confirmation unless you configure one. |
| Edit | Unlocks the active record for changes (the dataset switches to dsEdit state). |
| Post | Writes whatever was typed or changed back to the table. |
| Cancel | Throws away an in-progress edit or insert instead of saving it. |
| Refresh | Reloads the grid's data from the table — handy if something else may have changed the underlying records. |
The DBNavigator's Insert and Delete buttons act the instant they're clicked — there's no built-in step to check that what the user typed makes sense, or that a new primary key doesn't clash with one that already exists. That's exactly why the rest of this page prefers to add, edit and delete records through code: it gives you a chance to validate input and show your own confirmation messages first. A quick safety net if you do use the DBNavigator for deleting is to set its ConfirmDelete property to True, which pops up an "are you sure?" prompt before a record disappears.
DBEdit, DBText and DBCheckBox — Single-Field Controls
Sometimes a full grid is more than you need — you might just want one field of the current record shown somewhere on the Form, such as a name next to a photo. Each of these controls links to exactly one field, using the same two properties:
DataSource → select your TDataSource (dm.dsStudents)
DataField → choose the field from the dropdown (e.g. "Surname")| Control | Use for |
|---|---|
DBEdit | Any text or numeric field you want the user to be able to change. |
DBText | Showing a field's value without letting the user change it — useful for a read-only field such as a primary key. |
DBCheckBox | A True/False field, shown as a tick box instead of text. |
Delphi doesn't write a change to the table the instant it's made — it sits in a buffer until something posts it. That happens automatically the moment the user moves to a different record, or you can trigger it sooner yourself, either in code or via a DBNavigator's Post button.
Connecting a Database Dynamically (in Code)
Everything above used components dropped onto a Data Module at design time. You can also build the whole connection at runtime with code — no components needed. This is called a dynamic connection, and it is useful when the database path is only known while the program runs (e.g. the user browses to the file).
usesDynamic database objects live in two units. Add ADODB and DB to the uses clause before you can create them in code.
Declare the three objects (usually under public in the Data Module, or in the form):
public
  conDB  : TADOConnection;
  tblStudents : TADOTable;
  dsStudents  : TDataSource;
Create and wire them together — build the connection string, point the table at the connection, then link the DataSource:
procedure TdmData.DataModuleCreate(Sender: TObject);
begin
  // 1. Create the connection object
  conDB := TADOConnection.Create(Self);
  conDB.LoginPrompt := False;        // don't ask for a password
  conDB.ConnectionString :=
    'Provider=Microsoft.Jet.OLEDB.4.0;' +
    'Data Source=' + ExtractFilePath(Application.ExeName) + 'Students.mdb;';
  conDB.Connected := True;

  // 2. Create the table and link it to the connection
  tblStudents := TADOTable.Create(Self);
  tblStudents.Connection := conDB;
  tblStudents.TableName  := 'tblStudents';
  tblStudents.Active      := True;

  // 3. Create the DataSource and link it to the table
  dsStudents := TDataSource.Create(Self);
  dsStudents.DataSet := tblStudents;
end;
Finally, link your on-screen TDBGrid to the DataSource. Do this in the main form's OnShow event:
procedure TfrmMain.FormShow(Sender: TObject);
begin
  dbgStudents.DataSource := dmData.dsStudents;
end;The Data Module is usually created after the main form. If you try to link the grid in the main form's OnCreate event, the Data Module does not exist yet and you get an access violation error. Use OnShow, which fires later, once everything exists.