Introduction to Delphi Grade 10
Delphi is a visual programming environment — you design the screen AND write the code. You drag components onto a form to build the interface, then write Delphi code to make it all work. This page covers the IDE layout, components, naming, events, and your first program.
The Delphi IDE — What You See When You Open It
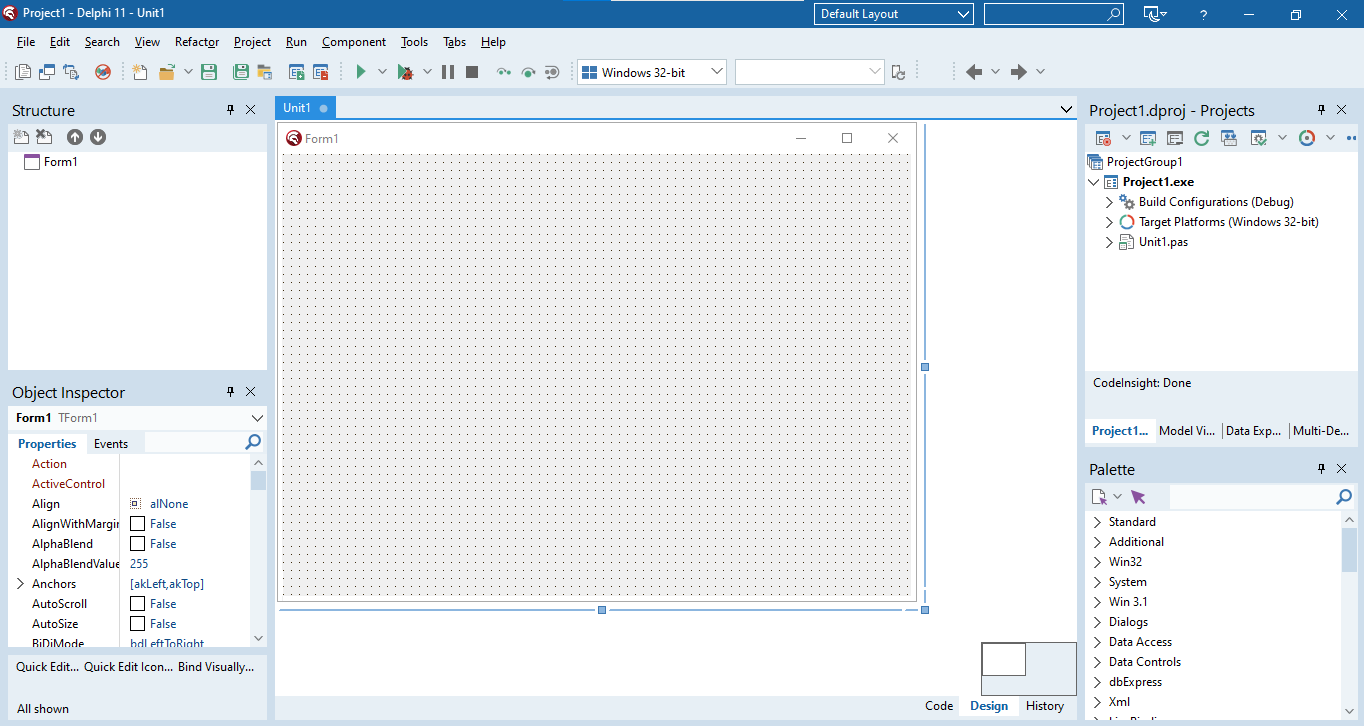
When you open Delphi, this is what you will see. It might look overwhelming at first — but each area has one clear job:
Switching to Code View
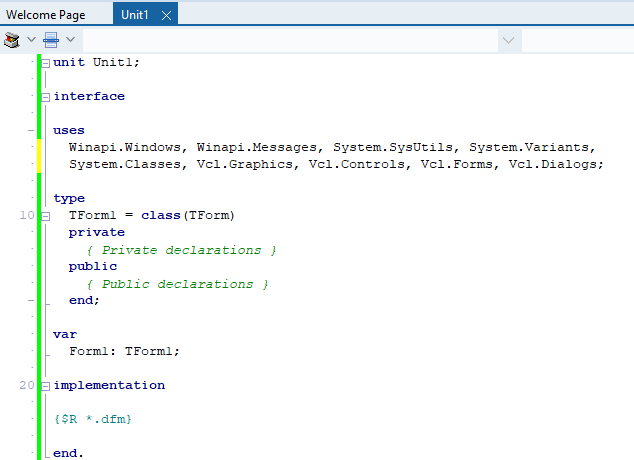
Press F12 to toggle between the Design View (what you see above) and the Code View (where you type your Delphi code).
The Delphi IDE Layout
An Integrated Development Environment (IDE) is a software application that combines the tools a programmer needs — a code editor, a compiler, and a debugger — into a single interface, so you can design, write, test and run a program without switching between separate tools.
Think of the IDE as your workshop — every tool you need (editor, compiler, debugger) is laid out and ready to use, all in one place.
RAD stands for Rapid Application Development. The label applies to Delphi because most of the visual work is already done for you: instead of writing code to draw a button or a text box pixel by pixel, you drag a ready-made component from the Tool Palette onto the form. Skipping that low-level drawing work is what lets a small classroom project turn into a working app within a single lesson.
Key IDE Panels
| Panel | Purpose |
|---|---|
| Menu Bar | Top menu — File, Edit, View, Project, Run, Tools etc. |
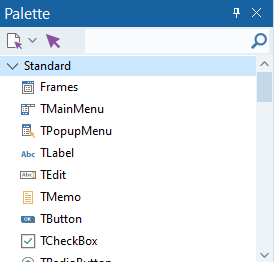
| Tool Palette | All Delphi components grouped by category. Click a component, then click on the form to place it. |
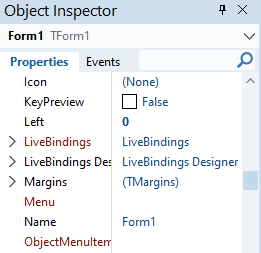
| Object Inspector | Sets the initial properties and events of a selected component. |
| Structure Panel (Object TreeView) | Quick reference showing all objects on the current form, displayed in a hierarchical (tree) view. |
| Form / Design Area | The visual canvas — drag and drop components here to build the UI. |
| Code View | Where you write Delphi code. Toggle with F12. |
Objects, Classes & Components
Delphi is an Object-Oriented Programming (OOP) language, so almost everything you place on a form is an object. To talk about objects precisely, three related terms are used:
| Term | Meaning |
|---|---|
| Class | The plan or blueprint for an object — for example TButton is the class that defines what every button can look like and do. Class names always start with a capital T. |
| Object | An instance of a class — an actual button, label or form that exists in your program, e.g. btnCalculate is an object (instantiation) of the class TButton. |
| Component | A particular type of object that can be placed on a form to build a user-friendly, interactive interface (e.g. a Button, Label or Edit). |
Before a house is built, an architect draws up plans — the class. Many houses can then be built from the same plan — each one is an object (an instantiation of the class). TButton is the plan; btnCalculate and btnCancel are two different objects built from that same plan.
Every object has:
- Attributes — what it looks like and contains, described through its properties and events.
- Behaviour — what it can do, described through its methods.
Basic Format of Statements
An assignment statement stores a value in a property or variable using the assignment operator :=. We use code in Delphi to assign values to properties of components in the following format:
Component.Property := Value;All the properties a component has can be seen in the Object Inspector when that component is selected — the same properties you set visually at design time can also be set in code.
- Always assign TO the component/property on the left side of
:=— never the other way round. - Every statement ends with a semicolon
;
Form1.Height := 500;
Form1.Width := 700;
Button1.Caption := 'Register';
Shape1.Top := 20;
Shape1.Left := 20;
Step-by-Step: Creating Your First Project
- File → New → Windows VCL Application — creates a blank Form (TForm).
- Place components by clicking them in the Tool Palette, then clicking on the form.
- Set properties in the Object Inspector (e.g. change a button's Caption).
- Double-click a button to go to Code View and write the event handler.
- File → Save All (Ctrl+Shift+S) — save in a NEW dedicated folder.
- Press F9 to compile and run.
Each project must be saved in its own dedicated folder. Save the Unit file as FileName_u.pas and the Project file as FileName_p.dpr. Never mix two projects in one folder.
The Files Delphi Creates
Delphi creates several files for every program, but you only ever need to save two of them yourself — Delphi regenerates the rest automatically when you run the program.
| File | Extension | Contains | Save it yourself? |
|---|---|---|---|
| Unit file | .pas | The Delphi code you write (event handlers, class definition) | Yes |
| Project file | .dpr | Information that ties the units of a project together | Yes |
| Form file | .dfm | The visual layout of the form and its components | No — saved automatically with the Unit |
If you need to copy a project to another computer, copy the .dpr, .dfm and .pas files — Delphi will recreate every other file the next time you run the program.
Visual Component Reference
Components are the building blocks placed on a form. Each is an object with properties and events. Here is what the most common ones look like:
Naming Convention
Every component gets a prefix that indicates its type, followed by a meaningful name. This makes code readable.
| Prefix | Component Type | Example |
|---|---|---|
btn | TButton | btnCalculate |
lbl | TLabel | lblResult |
edt | TEdit | edtName |
mem | TMemo | memOutput |
img | TImage | imgLogo |
pnl | TPanel | pnlHeader |
sed | TSpinEdit | sedNotes |
cbo | TComboBox | cboGrade |
lst | TListBox | lstNames |
rgp | TRadioGroup | rgpGender |
chk | TCheckBox | chkAgree |
tmr | TTimer | tmrClock |
Accelerator (Hot) Keys
Placing an & in front of a letter in a component's Caption underlines that letter and turns it into a keyboard shortcut. Pressing Alt + that letter clicks the component without using the mouse.
btnRed.Caption := '&Red'; // underlines the R — press Alt+R to click the buttonEvent-Driven Programming
Delphi programs are event-driven — code only runs when something HAPPENS (an event), like pressing a button, typing in a box, or a timer ticking.
Think of a vending machine. It just sits there doing nothing — until you push a button. That press is the event. The machine then dispenses the item — that is the event handler (your code). If no button is pressed, nothing happens. Delphi works exactly like this.
| Event | When it fires | Common use |
|---|---|---|
OnClick | User clicks a button / component | Calculate, submit, navigate |
OnChange | Text in an edit box changes | Live validation, update display |
OnKeyPress | A key is pressed while component has focus | Accept only numbers |
OnCreate | Form loads / opens | Initialise variables, load data |
OnTimer | Timer interval elapses | Countdown, clock display |
How to Create an Event Handler
- In Design View, double-click a button to create its
OnClickhandler automatically. - For other events, go to the Events tab in the Object Inspector and double-click next to the event name.
- Delphi creates a skeleton procedure. Write your code between
beginandend. - Never change the procedure header — only add code inside.
procedure TForm1.btnCalculateClick(Sender: TObject);
begin
  // Your code goes here
  ShowMessage('Button clicked!');
end;
ShowMessage and InputBox
ShowMessage displays a pop-up with a message. InputBox pops up a window asking the user to type something. Both are modal — the program pauses until the user responds.
ShowMessage('Hello world!');
ShowMessage('Result: ' + IntToStr(iAnswer));// Returns a string
sName := InputBox('Name', 'Enter your name:', '');
// Convert to integer
iNum := StrToInt(InputBox('Number', 'Enter a number:', ''));
// Convert to real
rAmount := StrToFloat(InputBox('Amount', 'Enter amount:', ''));
// Get first character only
cClass := InputBox('Class', 'Enter class:', '')[1];Components — Properties
Properties control how a component looks and behaves. Set them in the Object Inspector or through code.
| Property | Description | Example Value |
|---|---|---|
Name | Unique identifier used in code | btnCalculate |
Caption | Text shown on labels, buttons, forms | 'Calculate' |
Text | Text in a TEdit box | edtName.Text |
Height | Component height in pixels | 30 |
Width | Component width in pixels | 150 |
Font.Size | Text size | 14 |
Font.Color | Text colour (note: Color not Colour) | clRed |
Visible | Whether component is shown | True / False |
More Properties in Code
The same Component.Property := Value; format works for every property, including nested ones like Font.Color:
Label1.Font.Color   := clGreen;
Shape1.Brush.Color  := clRed;
Methods
Methods are pre-written operations that perform tasks on components. Format: ComponentName.Method;
| Method | Effect |
|---|---|
Button1.Hide; | Makes the button invisible |
Button1.Show; | Makes the button visible again |
Edit1.SetFocus; | Moves the cursor into the edit box |
Memo1.Clear; | Clears all text in the memo |
Form1.Close; | Closes the form / program |
RichEdit1.Lines.Add('text'); | Adds a new line to a RichEdit or Memo |
Syntax Rules
Forgetting the closing semicolon ; on a statement causes a syntax error. There is never a semicolon before else. Begin/end pairs must always match.